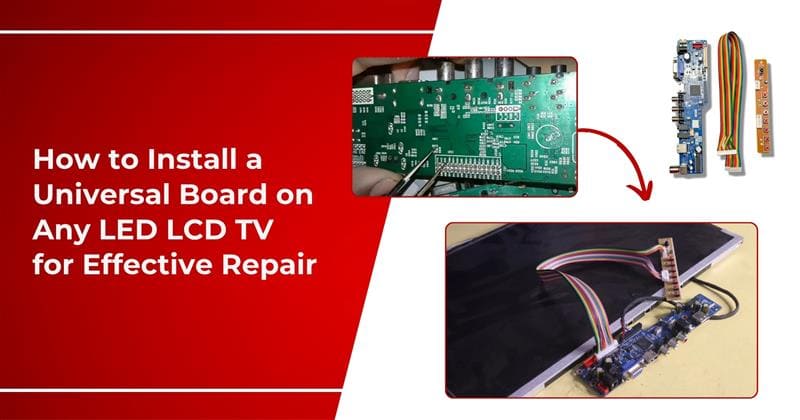
Is your TV showing no display, backlight issues, or power problems? Your mainboard (or T-Con board) may be the culprit. If your 2k resolution LCD/LED TV is not working and its main board is faulty and not available in the market, then you can install a universal board card in it.
A universal board can be cost-effective and easy to do at home. A universal controller board (sometimes called a "motherboard") can revive an LED/LCD TV. Universal TV Board, also called a Universal Mainboard or Driver Board. It is a multi-brand compatible replacement circuit board which primarily used to repair LED, LCD, and some older plasma TVs.
It replaces the original manufacturer’s mainboard when the OEM part is unavailable, too expensive, or discontinued.
Step-by-Step Guide to Universal TV Board Installation
- Cost-effective solution: Using a universal board is more cost-effective than OEM boards. OEM original manufacturer boards are 50 to 70% more expensive.
- Work with multiple TV brands: Universal board is perfect and compatible to use in multiple TV brands like Samsung, LG, Sony, TCL, more. One board can replace multiple OEM versions.
- Easy installation: Using a universal board is very easy to install. It seems difficult, but you can do it by yourself. Just plug and play with labelled connectors carefully.
- Improve features: Universal boards provide multiple input options and adjustable settings. According to the panel type and resolution, you can customise it.
- Faster availability: Universal boards are easily available online or offline. You do not have to wait for it, whereas the OEM board takes time and is difficult to arrange.
- Futureproof repairs: The Universal board can be used in another TV brand. You can later use it on another TV without any extra expense.
- Best for all: The Universal board is best to use in older TVs, for budget repair, and for DIY enthusiasts.
- Find and Buy Universal Compatible Board: Find your display’s model number printed on the LCD panel’s back. Buy the compatible universal box. It will come with an LVDS cable, a set of keyboard, a remote sensor, a remote and everything for fitting.
- Power Off & Disassemble the TV: Now, disconnect the television and carefully take the back panel off the device. Do not put the screws away. We will use them later. Unplug the cables with a steady hand.
- Remove the Defective Original Board: Unplug everything (power, LVDS / LED backlight ribbon cables, IR sensors and buttons). Lift the board by unscrewing it. Write or take a picture of every connection in case of necessity. For more insights into handling Electrical Issues in electronics, refer to our related articles.
- Install the Universal Board: Now, we will connect the new universal board at
the same place or in the same slot. To fix it in the same slot and location, download the
datasheet with the model number.
Check the LVDS port and its configuration, where the voltage is coming from and the signal is outputting. We have to match the old pin to the new connector pin carefully, so connect all the points in the same spots. Pull and plug each pin carefully. When everything is done, secure it back.
- Reconnect All Necessary Cables: Reconnect all main cables like LVDS Ribbon Cable(s), LED Backlight Connector, Power input, IR Receiver & Buttons to operate remotely and the panel.
- Initial Testing: Connect the power and switch on the board using its power button or the IR remote. When the screen lights up, it is time to configure inputs and menu settings. If you encounter issues like Device Overheating during testing, consult our troubleshooting guides.
- Power Down and Reassemble: When successful, switch off and unplug after testing. Reconnect the back panel and screws. Make sure none of the cabling is pinched when closing.
- Final Testing: Turn on the TV again. Check their HDMI, USB, AV inputs and picture clarity. Make sure the remote control and the buttons on the front panel are working properly.
Benefits of Using a Universal TV Board for Repairs
Using a universal main board gives a lot of advantages over the original manufacturer's OEM. Here is the key benefit of using a Universal TV Board for Repairs:
- No Display or Flickering Screen: Check the LVDS cable connection to ensure it is properly secured.
- Black Screen with Power Light On: Verify that the LED backlight cable is securely connected.
- Board Not Turning On: Confirm that the power supply is working and providing the correct voltage.
- Picture Works, No Audio: Check the audio settings in the board menu or ensure the speaker is correctly connected.
- Screen Freezes or Board Restarts Randomly: This often indicates an error in the power source. Inspect the power connections and supply.
Tips and Troubleshooting for Universal Board Installation
Here are some tips and troubleshooting when installing a universal board in any TV:
Conclusion
Installing a universal board is more effective than opting for an original manufacturer board. It is affordable and user-friendly, and easy to do at home. You can use a universal board for any type of
Ready to Master TV Repair and More? Join AK Info Today!
Are you passionate about electronics repair and eager to expand your skills beyond mobile phones to include TVs and other devices? AK Info offers comprehensive courses designed to equip you with the expertise needed to excel in the electronics repair industry.
Our expert-led training covers everything from basic diagnostics to advanced board-level repairs. Don't miss this opportunity to build a rewarding career in a high-demand field. Explore Our Courses and enrol with AK Info today! Call us at +91 96400 57000 or visit our website to learn more about our programs and how we can help you achieve your career goals.
Enquire Now